Overview

With Office Timeline, you can import Planned vs. Actual data from Excel into PowerPoint to compare your original plan against actual progress. This feature is available exclusively with the Expert plan. It's especially useful when managing project timelines using Excel Gantt chart templates or when creating a detailed PowerPoint Gantt chart to share with stakeholders. This guide will show you:
A) Preparing your data for import
B) Importing Planned vs. Actual data
Consult the comprehensive guide, navigate using the links above to access specific sections, or view this video summary:
A) Preparing your data for import
Before importing, ensure your Excel spreadsheet is set up with the correct columns so Office Timeline can create a Planned vs. Actual visual. Refer to the example below for guidance on organizging your data. Download the Excel sample here.
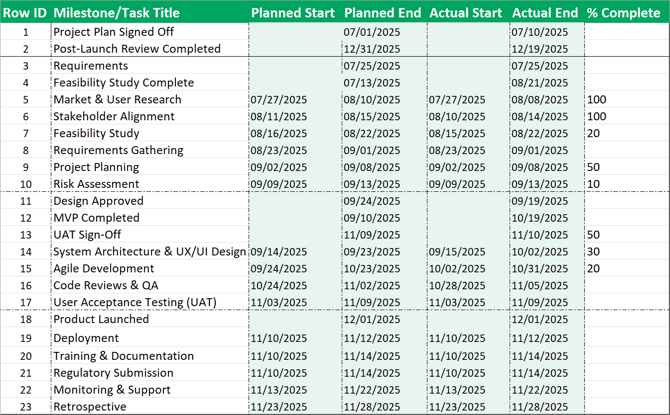
To import Planned vs. Actual data, your Excel file needs columns for Planned and Actual date sets (Start and End).

- Planned Start/End: Your baseline start and end date.
- Actual Start/End: Your actual start and end date.
Below is an example of how Planned vs. Actual tasks are displayed on a timeline.

If you do not need Planned vs. Actual data, use just one set of date columns and leave Planned vs. Actual turned off during import.
B) Importing Planned vs. Actual data
- Begin by creating a timeline from from Excel import.
- If it is your first time importing Planned vs. Actual data, you will see a prompt to enable Planned vs. Actual. If you select Skip for Now, you can still enable Planned vs. Actual in the Column Options or Advanced Tools.

- After clicking Enable Planned vs. Actual, make sure to toggle on the feature using the Column Options in the top-right of the window.

- Once enabled, confirm the mapping of both your Planned Start/End and Actual Start/End.
- Complete the import process by selecting your rows and clicking Import.
- You will now see both Actual and Planned Baselines represented visually in your timeline.

- You can also see and adjust your planned vs. actual data in the Edit Timeline tab.

For more information on Planned vs. Actual, visit this article.