Overview
Available exclusively in Expert plans, the Planned vs. Actual feature displays how actual progress compares to the original plan, with customizable styling that helps teams act fast and keep projects on track.
B) Edit tasks in the Edit Timeline tab
C) Edit Planned Start and End dates in the Edit Data tab
D) Planned vs. Actual Milestones
Consult the comprehensive guide, navigate using the links above to access specific sections, or view this video summary:
A) Enable Planned vs. Actual
Navigate to the Advanced Tools in the upper right corner of the Edit Timeline window to enable the Planned vs. Actual feature.
Customers on an Expert plan who do not see the ability to enable/disable Planned vs. Actual may need to update to the latest build of Office Timeline. Download the latest build here.
- Click on Advanced Tools to access options for activating Planned vs. Actual, Dependencies, and Critical Path.
- Toggle the switch next to Planned vs. Actual to activate it.

- Once activated, a grey bar underneath each task will become visible. This is the Baseline and represents the 'Planned' duration of the task.
- Enable/disable Planned vs. Actual from the side panel of the Edit Data tab.
Update the style of baselines using the style pane.
B) Edit tasks in the Edit Timeline tab
Drag and drop Actual & Planned in the Edit Timeline tab.

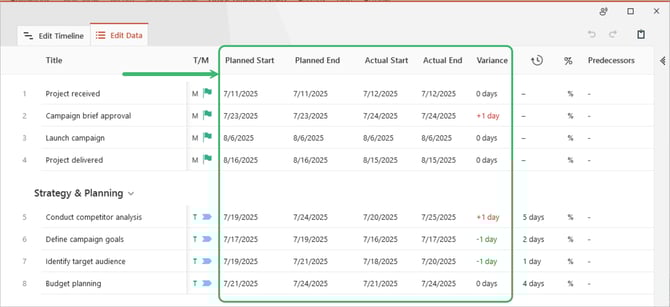
C) Edit Planned Start and End dates in the Edit Data tab
When Planned vs. Actual is enabled, notice that there are additional columns in the Edit Data tab:
- Planned Start/End: Baseline start and end dates.
- Actual Start/End: Actual start and end date.
- Variance: How much a task or milestone is early, on time, or late compared to the plan.
Adjust the planned and actual dates for milestones in the Edit Data tab.
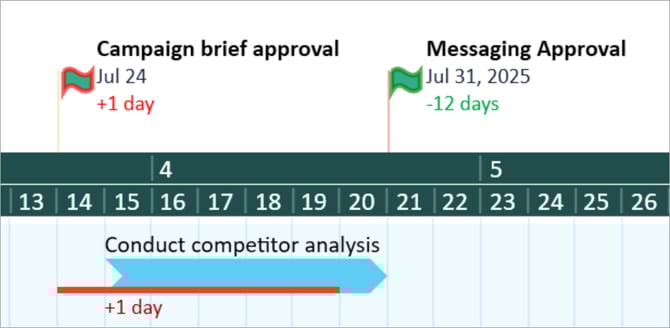
D) Planned vs. Actual Milestones
While there are no visible baselines for milestones, Delays or Advances can still be seen using Conditional Formatting and displaying Variance (see Styling Planned vs. Actual).
E) Styling Planned vs. Actual
Customize the appearance of both the Actual and Planned (Baseline) objects within the Style Pane.
With a task selected, the Actual tab will include all typical task customization, including shape, color, and fonts. In addition, you have the option to
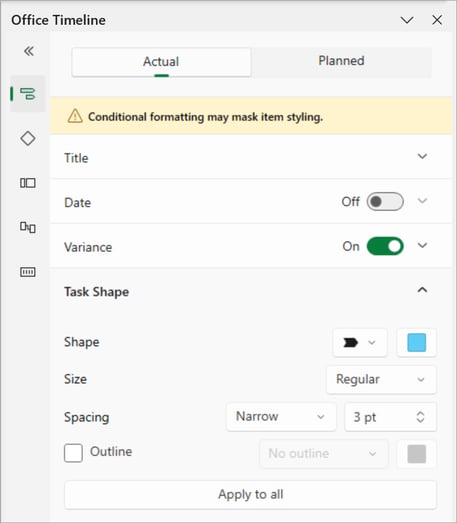
The Planned tab holds the ability to modify the color and transparency of Baselines. Additionally, you can switch the visibility of baselines on/off.

Also in the Planned tab is the ability to set Conditional Formatting.
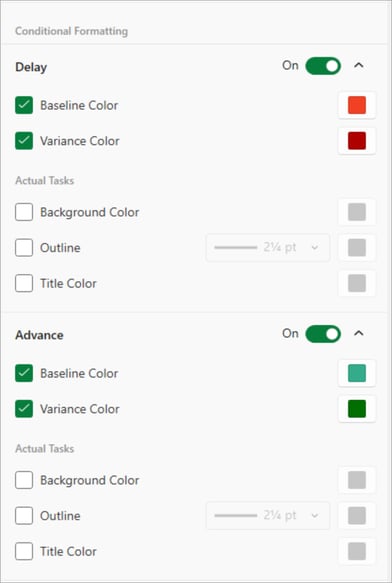
Here, you can adjust the default colors for Delay and Advance.

F) Disable Planned vs. Actual
Disable Planned vs. Actual via the toggle switches located in the Edit Timeline and Edit Data tabs.
Upon disabling Planned vs. Actual, choose if you wish to keep the tasks aligned with either the Planned or Actual start/end dates.

G) Variance Settings
Variance Settings automate when variance values appear on your timeline, removing the need to manually toggle variance visibility as your data changes. Variance shows the difference (in days) between Planned and Actual dates—positive values indicate delays, negative values indicate advances, and zero means the task is on schedule.
Use Variance Settings to automatically:
-
Hide zero-day variances to reduce clutter
-
Show variance only when a task is delayed
-
Show variance only when a task is ahead of schedule
-
Apply different display rules for tasks and milestones
These rules update dynamically whenever Planned or Actual dates change, ensuring your timeline stays accurate and clean with no manual adjustments required.

H) Frequently Asked Questions
What is Planned vs. Actual?
Planned vs. Actual is a timeline visualization tool that lets customers compare planned dates to actual progress using side-by-side bars for each task. It makes delays and trends immediately visible.
Is this feature available on all plans?
Planned vs. Actual is available exclusively with Expert plans.
Can I use this with milestones?
Yes. Planned and Actual dates can be adjusted from the Edit Timeline tab.
Can I import my Planned vs. Actual data?
Yes. It is possible to import Planned vs. Actual data into Office Timeline. Use this Excel sample to assist with imports. For detailed instructions on importing Planned vs. Actual data, please refer to this article.
What customization options are available?
It is possible to adjust the color and transparency of the baseline bar, as well as toggle its visibility for individual tasks. Use Conditional Formatting to set defaults for any delays or advances in tasks.
Does it work with dependencies and templates?
Planned vs. Actual works with custom templates and is fully compatible with Office Timeline’s dependency management features.