Overview
Office Timeline Pro is a legacy plan and is no longer available for purchase. Support and updates are still available.
Welcome and thank you for choosing Office Timeline Pro – we’re glad you’re here! Office Timeline Pro is a PowerPoint add-in that helps you quickly make and manage professional PowerPoint Gantt charts straight in your favorite presentation tool. This guide provides instructions and tips to get you started quickly.
A) Start a new Roadmap or Swimlane
B) Add or edit data
C) Rearrange or update anything by Drag & Drop
D) Customize your Roadmap
E) Standardize timelines with themes
F) Jumpstart your projects with templates
Read the full guide to learn how to make the most out of the Office Timeline Pro add-in or use the links above to skip to the topic you're interested in.
A) Start a new Roadmap or Swimlane

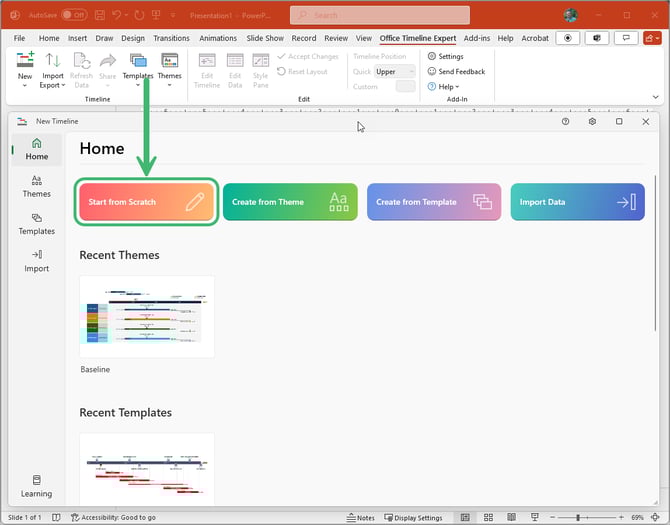
With Office Timeline Pro, there are 3 ways to start a new Roadmap or Swimlane (you can also make classic timelines and Gantt charts too if you wish):
-
Make it from scratch: From the Office Timeline Pro tab on the PowerPoint ribbon, click New and choose Start from Scratch.
-
Use a theme or a template: Again from New, select one of the built-in themes or timeline templates available and add your project's data.
-
Import data from other sources: Click Import on the Office Timeline tab to load existing data from Excel and instantly turn it into a timeline. The steps are quite similar whichever tool you import your data from.
We will Start from Scratch, so you can see how simple it is to make an impressive PowerPoint roadmap from head to toes.
B) Add or edit data
When you click Start from Scratch in the Timeline Wizard, it will open the Edit Data view, which allows you to add and edit milestones and tasks and to define Swimlanes.
-
For each item you wish to add to your visual, type in its Title, choose its type – Task (T) or Milestone (M) - and enter its Start date and End date (milestones will have the exact same Start and End dates). You can also add % Complete to your tasks here to show progress.

Note: The Data wizard is a great place to start experimenting with colors and shapes. All changes you make here are instantly displayed in a real-time thumbnail view of your timeline. -
To create Swimlanes, click on Add Swimlane and type in a name for your new lane. We'd recommend keeping these names short for the best fit on the visual.

-
To add tasks and milestones inside a Swimlane, click right below the lane's name and enter your data, or you can just drag some of your existing items into it.

As you add, edit and move data, take a look at the live preview of your timeline on the right. You'll notice that items that don't belong to any swimlane will be linked directly to the timescale.
Quick Tips:
-
Office Timeline Pro also lets you make timelines and roadmaps scaled down to hours or minutes. To add Start and End times to your tasks and milestones, simply click on the Add column button and then toggle on the Hours and minutes column from the menu.

-
On standard timelines and Gantt charts (that don’t have Swimlanes), you can instantly reorder your tasks and milestones by Start Date, End Date or any other criteria. To do this, just click on the corresponding column header in the Data View.
-
You can access the Data View at any time to make adjustments or updates after creating your timeline slide. To do so, simply click the Edit Data button on Office Timeline tab.
C) Rearrange or update anything by Drag & Drop
Once you're done adding milestones and tasks in the Edit Data window, it's time to move to the Edit Timeline view. To access it, click on the Timeline tab from your data list.
Note: Once you've created your slide, you can also access the Timeline view by clicking the Edit Timeline button on the ribbon.

The Timeline view is one of our favorite things about the Pro add-in – it’s a simple visual Drag & Drop editor that lets you rearrange, edit and update items on your roadmap using just your mouse!

Here are just a few changes you can do in the Edit Timeline view:
-
Drag milestones and tasks from the timescale to any swimlane.
-
Easily reorder items.
-
Drag milestones and tasks horizontally to instantly update their dates.
-
Drag task bars by their corners to change their duration.
-
Rearrange whole Swimlanes or even split them above and below the timescale.
-
Drag milestones and tasks from one lane to another or move them outside swimlanes, linked directly to the timescale.
-
Group milestones and tasks on one row or even place milestones on tasks.
-
Change the position of any text or date.
-
Resize task bars and text boxes for a better fit.
-
Quickly reposition the timeline on the slide.
-
Drag the timescale horizontally to adjust its width.
-
Resize swimlane headers for a better fit.
-
Add, duplicate, delete or hide milestones and tasks using the simple controls in the top-left corner of the window.
-
Double-click to edit any text or date.
It really makes it easy to find the perfect layout or update the plan on the fly!
D) Quickly customize your roadmap
After you've created your roadmap slide, you can customize every detail on it using the Office Timeline Style Pane on the right side of the screen. Simply select the desired object to open its styling options in the pane.

The Style Pane lets you personalize individual timeline and Swimlane elements in multiple ways - from shapes, sizes, colors, and positions to fonts and date formats, or the timeline scale (from days to weeks, months etc.). You can even add extras such as task duration, elapsed time, "Today" marker or percent complete, or hide dates and other details.
Every item on the roadmap can be fully customized from the Style Pane, so you can get your slide looking exactly how you want it.
E) Standardize timelines with themes
Office Timeline comes with a collection of beautiful themes that you can apply to your visuals to change their look effortlessly and ensure a uniform style in your project communications. Simply pick any theme you like from the Themes window, click Apply, and the add-in will instantly transform your timeline.

F) Jumpstart your projects with templates
Office Timeline Pro comes with professional-looking built-in templates to help you get started fast and save time on customizations.
-
From the Timeline Wizard, click Create from Template and click the one you'd like to use to open a preview of it.

-
From the preview, select Create Timeline to manually update it with your own data, or click on Import Data to bring your plan from Project, Excel, or other sources straight into the template.

-
Simple as that! The template will be updated with your data and you'll get an impressive timeline slide in seconds.
The steps and tips above should get you started quickly. If you have questions or need assistance, contact us and we'll be happy to help.