Overview
With Office Timeline, you can import a project or board from Atlassian Cloud's Jira Software, Jira Work Management, or Jira Service Management and quickly turn it into an easy-to-understand PowerPoint timeline. This guide will show you exactly how it works. We’ll cover:
A) Setting up your Jira data for importing
B) Authorizing access to your Jira site(s)
C) Selecting your data source and filtering data
Basics
Mapping Swimlanes & Sub-Swimlanes
E) Selecting the rows to import
Read the whole guide to learn the ins and outs of importing from Jira, or jump to the chapter you’re interested in using the links above.
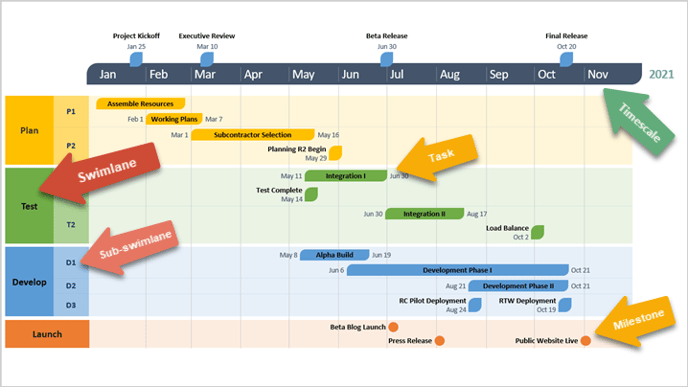
Before getting started, you can also have a quick look at some key timeline elements that we’ll be mentioning here:
A) Setting up your Jira data for importing
Before importing from Jira into Office Timeline, you may need to make a few tweaks to your issues in Jira to ensure a successful import.

Since Office Timeline will turn your Jira issues into tasks and milestones on a timeline slide, it will need to pull data from Jira that can serve as:
- Task/Milestone Titles (typically your issues’ “Summary” field in Jira)
- Start Dates (e.g. the “Start Date”, “Target start”, “Actual start” or any custom date format field you have in Jira)
- End Dates (e.g. “Due date”, “Target end”, “Actual end”, or any custom date format field in Jira)
Therefore, if you don’t typically work with two different date fields in your Jira project that can serve as Start and End dates in Office Timeline, make sure to add such date fields to your issues in Jira before importing.
Note: Issues that have one of the two date fields filled out will be imported as milestones, while those that have both dates filled out will appear as tasks on your PowerPoint timeline.
Other, optional fields can also be imported into Office Timeline: for instance, you can bring in your issues’ Comments as Notes, or import various fields from Jira (like Status, Category, Sprint, Team, etc.) to use as Swimlanes and Sub-Swimlanes on your timeline slide.
B) Connecting to Jira and authorizing access to your site
Once you’re all set in Jira and ready to import, connecting to Jira from Office Timeline is fast and simple:
- Click the Import/Export button on the Office Timeline ribbon in PowerPoint, select Import, and choose Jira from the window that pops up.

- From the Jira import wizard, log in to your Atlassian account and grant us access to your Jira site.

Note: If you need to authorize Office Timeline for a new Jira site, log out and log in again, and then pick the desired instance from the “Authorize for site” list. With multiple sites authorized, you’ll be able to switch between them from the account dropdown:
C) Selecting your data source and filtering data
If you have both projects and boards on your selected Jira site, you’ll be asked to choose between the two sources before moving forward:

-
Projects
Choosing projects as source type will lead you to the projects screen, where you can:
- Select the project from which you’d like to import your data.

Quick tip: With Office Timeline Expert, you can select multiple projects to import data from so you can align them on a single, easy-to-read timeline. - Apply one the filters you have saved in Jira, so you can quickly get the exact data set you need from your selected project. To do so, simply click the Jira Filters button in the top-right corner and choose your desired filter:

Office Timeline will pull from Jira only the issues that match the chosen filter.
-
Boards
Choosing boards as your source type will allow you to select one of your boards in Jira to use for your import.

Quick tips:
- Use the Search field at the top to quickly find a particular board name you’re looking for.
- Use the View by Project menu to view only the boards that contain the particular projects you’re interested in.

- With Expert, you can select multiple Jira boards to import data from and turn them into a high-level roadmap.
Once you’ve chosen the project or board you want to use, click the Next button to move to the next step: mapping columns.
D) How to map your data for importing
-
Basics
- After loading your data source, the add-in should automatically map the mandatory columns needed to generate your timeline: Title, Start Date and End Date. Optionally, you can also map the Swimlane, Sub-Swimlane or Notes columns.

Note: In our example above, the headers on the first row are the Office Timeline headers, while the ones on the second row are the corresponding issue fields we have in Jira. - If you need other fields from Jira than the ones initially mapped, you can map others or remap existing ones. Just click the dropdown arrow above the column you want to map and select the corresponding Office Timeline header for it:

Quick tip: If there’s any mapped column that you don’t want to import, click the dropdown arrow by its header and select Unmap to ignore it:
-
Mapping Swimlanes and Sub-Swimlanes for importing
Mapping the Swimlane and Sub-swimlane columns when importing will group your Jira issues into lanes on the resulting timeline, similar to what you see in the image below:

By default, Office Timeline will map the Swimlane column to the Category field if it detects it in your chosen Jira source. However, you can:
- Map the Swimlane and Sub-Swimlane columns to any relevant fields you have in Jira, such as Project (if you're importing a board with multiple projects), Priority, Status, Severity, Team, etc.
- Unmap the Swimlane and Sub-Swimlane columns if you’d prefer a basic Gantt chart or timeline.
Important notes:
- Issues that have the same value in the Swimlane column will be placed on the same lane on the timeline. Similarly, items that belong to the same Swimlane and have identical names in the Sub-Swimlane column will be placed in the same sub-lane when importing.

- Issues that don’t have anything filled out in the Swimlane column will be placed directly above or below the timescale – not inside a lane.

- If some of the issues belonging to a Swimlane don’t have any data in the Sub-Swimlane column (while others do), we will automatically group them for you into a generic, untitled sub-lane.

- If ALL issues belonging to a Swimlane have the Sub-Swimlane field empty, Office Timeline will simply group them inside their “parent” Swimlane, with no Sub-Swimlanes in it.

E) Select which rows to import
When done mapping columns, you'll get to the Select Rows step, where you can double-check your data and choose the specific tasks and milestones you want to import into your timeline.

Use the checkboxes next to each row to select or deselect individual tasks and milestones, or click the box in the top-left corner of the table to select/deselect all visible rows:

Quick tips:
- If you have a lot of data in your chosen Jira source, we'd recommend importing only the key tasks and milestones to ensure you get a clean timeline that's easy to follow.
- For projects that contain parent and child issues (e.g. tasks with subtasks), you can quickly select the whole group by selecting the parent. To select just the parent without its child items, hold Ctrl and click its corresponding checkbox.
If the issues in your Jira source are organized by hierarchy levels (e.g. tasks and sub-tasks), you can use the View menu above the table to choose the level you want to keep in view. In our example below, we selected “Level 1” to see just the major tasks:

Then you can just tick the checkbox in the upper-left corner of the table to select or deselect all (and only) the parent tasks.
When happy with the data selected for importing, click the green Import button, and the add-in will instantly generate your PowerPoint timeline, which you can then edit and style as you wish.

Quick tips:
- Whenever you make changes to your issues in Jira, click Refresh Data on the Office Timeline ribbon in PowerPoint to effortlessly update your timeline slide too. Just follow these simple steps for refreshing Jira imports.
- You can import your Jira data directly into a built-in Office Timeline theme. This will save you time styling your visual and help you standardize project communications.
If you run into any issues or need help importing from Jira into Office Timeline, don't hesitate to contact us. We'll be happy to help!