
Overview
Office Timeline lets you import your Microsoft Project plan into PowerPoint directly as a Swimlane diagram, without you having to manually group tasks into lanes on your slide. You can also import Sub-swimlanes (or nested lanes), which will enable you to show programs with multiple projects on your slide. This guide will show you:
I) How to import Swimlanes from Project
II) How to import Sub-swimlanes from Project
Read the full guide or, if you are already familiar with importing Swimlanes, click the link above to jump straight to the sub-swimlanes chapter.
Before getting started, if you need a quick reminder of our terminology, take a look at some key timeline elements that we’ll be mentioning here:
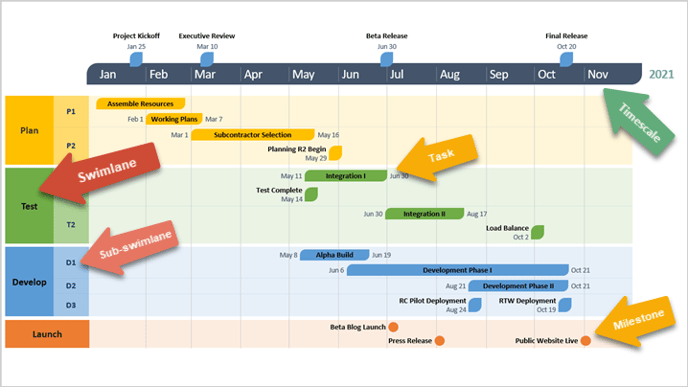
I) How to import Swimlanes from Project
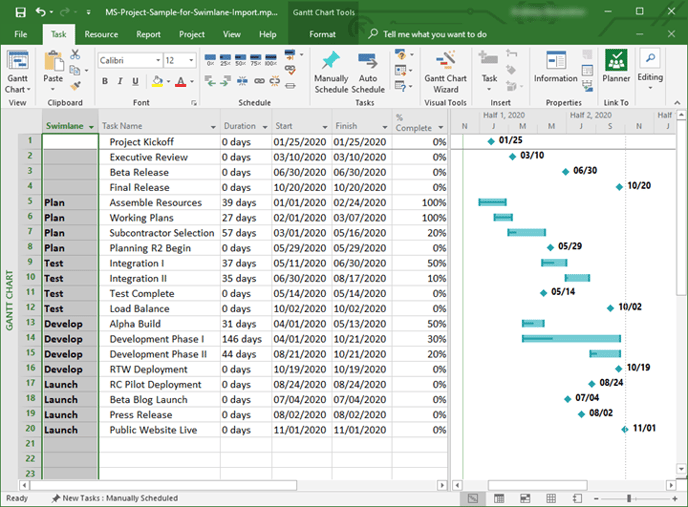
To import Swimlanes from MS Project, you'll first need to make some adjustments to the data in your .mpp file, similar to what we did in the screenshot below.
Read on to find out how to set up your Project plan so you can instantly turn it into a PowerPoint Swimlane or Roadmap.
Steps
-
For a standard Gantt chart import, Office Timeline needs to pull from Project only your basic task and milestone data (e.g. Name, Duration, Start, and Finish). To import your plan as a Swimlane, you'll need to add an extra "Swimlane" column in MS Project (simply insert a text column without any special settings and type "Swimlane" directly in the Header name).

IMPORTANT: Please make sure to label this column as "Swimlane" so the add-in can map it automatically when importing your data.
-
In the new "Swimlane" column, type in the name of the lane you want each task or milestone to belong to. Items that have the same Swimlane name will be automatically grouped into the same lane when they're imported.

-
If you want to keep some tasks or milestones linked straight to the graphic's timescale – not inside a specific lane – simply leave their Swimlane fields empty.

-
After you've set up and saved your .mpp file, open PowerPoint, click Import on the Office Timeline tab, and then follow the simple Project Import steps.

Note: You can even import your MS Project data directly into a theme or a Swimlane template. To do so, go to New on the Office Timeline ribbon, choose a template or theme you like, and then select Import.
-
Office Timeline will automatically turn your MS Project data into a Swimlane slide that you can customize and manage effortlessly.

Quick tip: Whenever your plan in MS Project changes, you can click Refresh Data on the Office Timeline ribbon to quickly update your Swimlane slide as well.

Notes:
-
If you want to import milestones from Project, remember to make sure their duration is set to 0 days or that they are specifically marked as Milestones – otherwise, Office Timeline will import them as tasks by default.
- The records in your Project file don't have to be arranged by Swimlane name. You can order them in any other way - when importing the .mpp file, all tasks and milestones with the same Swimlane name will be placed in the same lane, while those that have the field empty will be linked directly to the timescale.
II) How to import Sub-swimlanes from Project
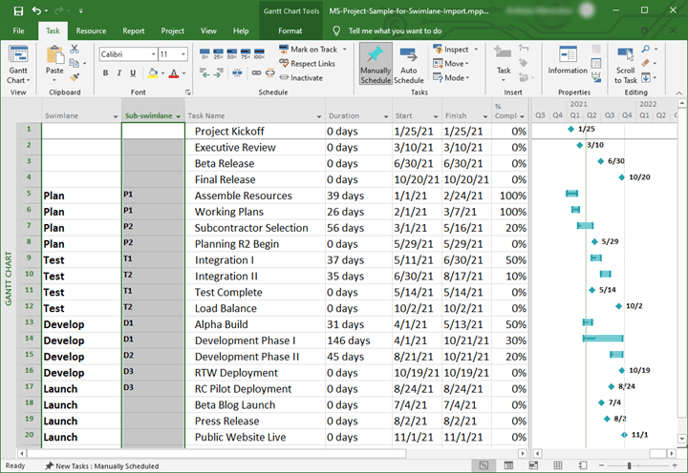
Once you’re familiar with importing your Project file as a Swimlane slide, you should have no trouble importing sub-swimlanes - the process is quite similar. Below you can see an example of how you can set up your .mpp data to import it into nested Swimlanes:
Steps
-
After you’ve set up your “Swimlane” column in Microsoft Project, add another one called “Sub-swimlane” next to it. You will use this new column to define the sub-lanes.

Note: Naming this new column “Sub-swimlane” will help Office Timeline detect and map it automatically when importing your project data.
-
In the new column, type in the name of the sub-swimlane you’d like each of your tasks and milestones to belong to. Items that belong to the same Swimlane (“parent” lane) and have identical Sub-swimlane names will be placed in the same “child” lane when importing.

-
If you wish to keep some “standard” Swimlanes – without any sub-lanes, simply leave the corresponding Sub-swimlane fields empty:

-
Once you’re done setting up your .mpp file for nested swimlanes, follow the usual Project import steps.

-
Office Timeline will instantly turn your Project data into a visual PowerPoint slide with Swimlanes and Sub-swimlanes, which you can edit and style as needed.

Quick tips:
-
You can import sub-swimlanes from Microsoft Project directly into an Office Timeline theme or template. This will help you save time customizing your slide.
- When your Project data changes, you can Refresh to update your Sub-swimlane slide just as you would any other timeline.