Overview
Important Note! Want to keep your timeline looking sharp? Use the Edit Timeline window in the Office Timeline Add-in to move objects—dragging and dropping directly on the slide won’t do the trick. Click here to see how easy it is!
Office Timeline allows you to add dependencies to your timeline for more effective scheduling, tracking, and reporting. With this powerful functionality, you’ll be able to easily show how tasks and milestones are connected, shift dates easily when plans change, and even automatically calculate the critical path.
This guide will teach you the basics of using dependencies in Office Timeline. You’ll learn:
B) How to add and manage dependencies
D) How to disable dependencies
E) Dependency & scheduling definitions
Read the full guide or use the links above to jump straight to the chapter you’re interested in. For definitions of the dependency & scheduling terms used throughout this guide, scroll towards the end or click here to jump to the glossary.
A) How to enable dependencies
Before you can dependencies to your timeline slide, you must first enable the functionality either from the Timeline view or the Data view.
-
Timeline view. From your timeline slide, open the Edit Timeline view and switch on the Dependencies toggle from the dropdown menu you’ll see on the top-right of the window.

-
Data view. From your current timeline, open the Edit Data window and switch on the Predecessors toggle from the Add column menu above your data table. This will automatically enable dependencies on your timeline and add a Predecessors column in the Data view.

Note: Both of the options above will enable dependencies only on your current timeline. If you’d like to have dependencies enabled by default on any new timeline you create, you can do so from Office Timeline’s Settings window:

B) How to add and manage dependencies
Once you’ve enabled dependencies, there are two ways you can add and manage dependency links in Office Timelinef: you can either use drag & drop in the Timeline view, or enter and edit predecessors in the Data view.
-
Add and manage dependencies in the Timeline View
-
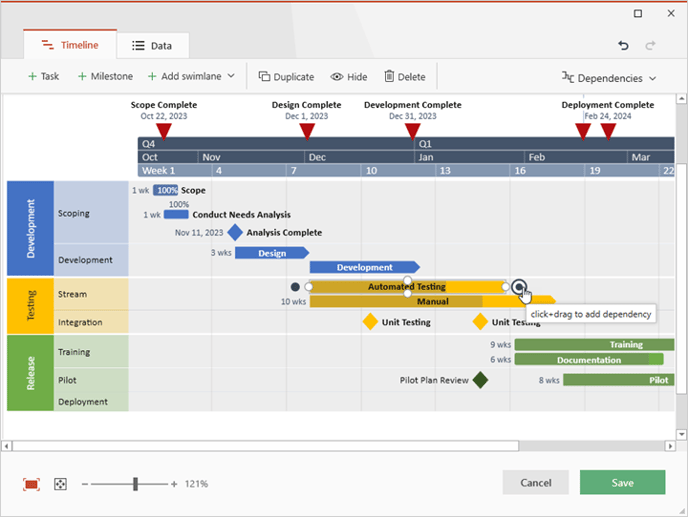
To add a Finish to Start dependency link, select the predecessor task (or milestone) and drag the end circle (the one on the right) to the start (left) of the successor task (or milestone):

-
To add a Start to Start dependency link, select the predecessor task and drag the left-side circle towards the start of the successor task:

-
To add a Start to Finish dependency link, drag the left-side circle from the predecessor towards the end of the successor:

-
To add a Finish to Finish dependency link, drag the right-side circle from the predecessor towards the end of the successor:

-
To hide or delete a dependency, select the dependency link and click the relevant button from the task bar:

Note: To unhide a hidden dependency link, you’ll need to go to the Data View and click the strikethrough eye icon in the dependency editor corresponding to your desired dependency:
-
You can also reposition the connection points of a dependency link. By default, we automatically set the best position to ensure legibility, but you can change this as desired from the top taskbar:

Once you’re done adding and editing dependencies in the Timeline view, don’t forget to click Save.
-
Add and manage dependencies in the Data View
If you’re used to working with dependencies from your usual project management tools, you may prefer linking your tasks and milestones directly in the Data view, using the Predecessors column.

Here’s how it works:
-
Click the Edit icon in the Predecessors column to open the dependency editor corresponding to the desired task or milestone. In our example, we will open the dependency editor for Analysis Complete, the 8th item in our data table.

-
In the dependency editor window, enter the predecessor (or predecessors) of your selected item:

-
Then, for each predecessor entered, select the type of dependency relationship they will have with your selected item:

-
You can also add a lag or lead time to each predecessor if needed. For lag, type a positive number followed by the time unit, while for lead, use a negative number, again, followed by the time unit.

In our example above, we scheduled a 7-day lag for predecessor 7 (Conduct needs analysis), which means our selected milestone (8. Analysis complete) will be scheduled to start 7 days after task 7 is finished. Similarly, predecessor 6 (Scope) has lag of -5 days (which means a 5-day lead), which means our selected item (8. Analysis complete) will be scheduled to finish 5 days before “Scope” is finished. -
To hide or delete a dependency, use the eye or trash icon next to its corresponding row. The action will hide or delete strictly the dependency link, not the predecessors involved in the dependency relationship.

-
To unhide a hidden dependency link, just click the strikethrough eye icon next to the desired predecessor in the dependency editor:
Advanced tip:
You can also create dependencies by typing the needed data directly in the Predecessors column. For each predecessor, you’ll need to add its row number and the dependency relationship (FS = Finish to Start, SS = Start to Start, SF = Start to Finish, FF= Finish to Finish). Optionally, you can add lag too by entering a positive or negative number, followed by the time unit.
 Once done adding and managing dependencies in the Data view, don’t forget to click Save.
Notes:
- Depending on your scheduling settings, your linked tasks and milestones will automatically shift dates based on the dependency relationships between them. This can be of great help when scheduling and can save you a lot of time updating your timeline when plans change.
- For a more accurate view over your project plan, you can also enable the critical path after you’ve added dependencies to your timeline.
- If you typically manage your plans in Microsoft Project or Smartsheet, you can import your project plan into Office Timeline together with the dependency relationships you’ve already set there.
C) Style dependencies
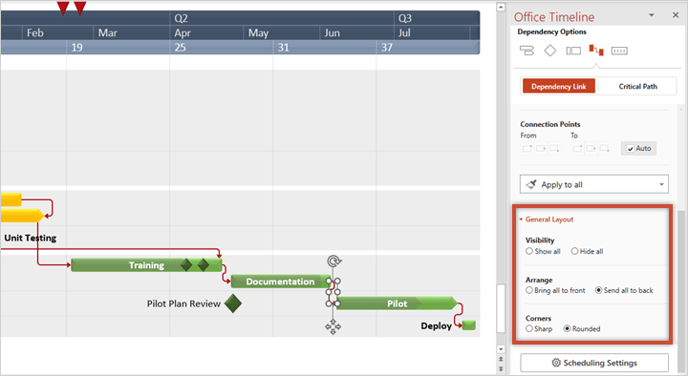
After you’ve set up your timeline’s dependencies, you can personalize the dependency links just the way you want them from the Style Pane. Just select one or more dependency links on your timeline and then use the options in the Style Pane to set colors, transparency, dash types & sizes, connection points and more:

You can click Apply to all to instantly transfer your styling preferences to all dependency links: 
From the General Layout section in the Style Pane, you can quickly set overall preferences that will impact all your dependency links:
- quickly hide or show all dependencies
- bring them all to front, or send them all to back
- choose either sharp or rounded corners for all dependency links
D) Disable dependencies
If you don’t want to show any dependencies on your timeline, you can simply hide them using any of the options mentioned in the previous chapters. This will make all dependency links invisible and it will stop automatic scheduling based on dependencies, but without deleting your dependency data.
You can, however, completely disable the Dependencies functionality on your current timeline, which means you will no longer see dependency-related options, and all data and styling choices related to dependencies will be permanently deleted from your timeline slide.
To do so, open the Timeline view and switch off the Dependencies toggle from the top-right dropdown menu:
 To disable dependency functionalities for all future timelines too, open the Settings window from the Office Timeline ribbon and switch off the Dependencies toggle:

E) Dependency & scheduling definitions
Predecessor = a task or milestone whose start or finish controls the start or finish of another task or milestone.
Successor = a task or milestone whose start or finish is controlled by the start or finish of another task or milestone.
Finish to Start dependency (FS) = the Predecessor must end before the Successor can begin.
Start to Start dependency (SS) = the Predecessor must begin before the Successor can begin.
Finish to Finish dependency (FF) = the Predecessor must end before the Successor can end.
Start to Finish dependency (SF) = the Predecessor must begin before the Successor can end.
Lag =a set amount of time a successor will be delayed with respect to its predecessor. Lag time is directly scheduled into the project.
Lead = a set amount of time a successor will be advanced with respect to its predecessor. Lead time is directly added to the project.
Slack = also called float, slack is the amount of time an activity can be delayed without causing a delay in subsequent tasks or the project’s final delivery date. Slack is not directly added to the project, but it’s rather a result of how various tasks are scheduled.
Critical Path = the critical path is a series of interdependent activities (or sometimes a single one) that directly affect the project’s finish date. If any of the activities on the critical path is late, the whole project will be late.
If you have questions or need further guidance using dependencies, don’t hesitate to contact us at support@officetimeline.com. We’ll be glad to help!